How to Protect Your SQL Server Database Against MITM Attacks with DataSunrise
1 What is MITM?
When a client connects to a server via a protected channel, there is a risk of a third party connecting between them that has an ability to listen and interfere with the communications. Network attacks launched by means of such a third party, are called Man in the middle (MITM) attacks. There are a lot of ways to perform such an attack, but the basic principle of them is to secretly make the client connect to the attacker’s server.
2 How to protect against MITM?
The main method of protection against MITM attacks is analyzing of the network infrastructure at the moment of connecting to the server and detection of suspicious parameters that are not typical for connection to a certain server. If SSL protocol is used for protection, a client can check the server’s certificate during the handshake. A certificate can have a lot of parameters, exchanged between the client and the server during authentication. Standard practice for SSL is to terminate a connection immediately if one party accepts a parameter (Directory name, DNS, Email, GUID, IP, UPN, URL and any other) which is not relevant to parameters of its environment. But even such a certificate check cannot guarantee full safety, because the client’s infrastructure at the moment of attack can be changed significantly to pass the check. That’s why additional methods of certificate validation are often used. One of such methods is signing a certificate by a trusted authority. It is deemed that it is impossible to forge such a signature, and every client can check its authenticity. That’s why any certificate signed by a special authority could be accepted as more or less safe, depending on the authority of the issuer.
3 Protection against MITM in MS SQL Server
Certificate check is optional in MS SQL, but it is enabled by default. Two major parameters participating in a certificate check are the certificate expiration date and the name of the host the certificate is issued for (Common Name). If a certificate is expired, or it is not issued for the host of a server a connection is established with, the connection would be terminated immediately with notification of the user. In case a certification authority is involved in additional certificate check, the client will check its signature. In such cases, there should be a root certificate of this authority at the certificate storage. Many modern operating systems include prebuilt sets of root certificates of the most trusted authorities, that’s why when selecting a certificate authority for signing a corporate certificate, it would be wise to select the one from the list.
In modern SSMS, there is an additional checkbox «Trust server certificate» at the server connection page. It is used to check the server’s certificate. When connecting to a server via ODBC, there is an additional parameter, “TrustServerCertificate”, in the connection string. “Yes” value disables the check and “no“ – enables.
4 Certificates in DataSunrise
DataSunrise’s proxy is trusted, but, nevertheless a third party of the connection, that’s why all client’s means of protection against MITM would be activated at the moment of connection with such a proxy.
In DataSunrise, each database instance operates with a set of private keys and a certificate. From the client’s point of view, this set belongs to the server, but in general, these keys are not associated with the end server that serves DataSunrise’s proxy in any way. It is this certificate a client will check if protection against MITM is activated.
5 Possible DataSunrise configurations including protection against MITM
To provide a similar level of protection of direct connection and proxy connection, it is necessary to configure DataSunrise’s and client’s hosts correctly. There could be several configuration options.
A default set of keys and a certificate provide minimal protection. It is not guaranteed that the default certificate corresponds to the CN=DataSunrise Database Security Suite hostname. That’s why the first thing you should do to secure a connection is to generate a new set of keys and a certificate.
A basic set of keys and a certificate are included into the proxy.pem file. It is this file that should be replaced.
5.1 General case
This is the simplest case, when an administrator has only one instance of DataSunrise at disposal, and one MS SQL server. And there is a limited, established set of clients that can get access to given servers through DataSunrise. This case involves two options:
5.1.1 Generating of proxy.pem (self-signed certificate)
It is the simplest method of generating new keys. Create a proxy.cfg file (“commonName” should include an actual name of DataSunrise’s host):
 [req]
distinguished_name = req_distinguished_name
prompt = no
[req_distinguished_name]
countryName = US
stateOrProvinceName = Washington
localityName = Seattle
organizationName = Sunrise
organizationalUnitName = IT
commonName = wmserver.db.local
emailAddress = [email protected]
Execute the following .bat file in the folder where the proxy.config file is located:
 SET RANDFILE=random
SET PASS=R0T3qSW2s0459koH54
openssl genrsa -des3 -passout pass:%PASS% -out key.pem 2048
openssl rsa -passin pass:%PASS% -in key.pem -out key.pem
openssl req -config proxy.cfg -new -key key.pem -out certificate.req
openssl req -sha384 -x509 -config proxy.cfg -days 365 -key key.pem -in certificate.req -out certificate.cer
openssl ecparam -genkey -name secp256r1 -out ec.pem
openssl dhparam -out dh.pem 1024
COPY certificate.cer+key.pem+dh.pem+ec.pem proxy.pem /b
DEL random certificate.req key.pem dh.pem ec.pem
After execution of the script we should get a proxy.pem file with a 2048-bit RSA key, a 1024-bit DH key, EC parameters with “secp256r1” curve and a certificate issued for 365 days with “sha384” signing algorithm.
Additionally, there should be generated a certificate.cer file which should be installed to the trusted certificates storage of the client.
5.1.2 Installation of a certificate and proxy keys via the UI
If a user already has a set of keys and a certificate, they could be installed via the DataSunrise’s web UI.
To set keys and a certificate for a proxy, perform the following:
- Create an SSL Key Group with the Client Side type.
- Fill this group with all necessary parameters in Base64 encoding: a certificate, a private key, DH parameters, EC parameters
- Connect this group to an instance by selecting it from the Key Group list
Both options (5.1.1 and 5.1.2) demand you to restart the DataSunrise’s Core after you’ve replaced the keys, and install a certificate created for DataSunrise into a trusted certificate storage at client’s side.
5.2 Several DataSunrise instances
The next configuration is for multiple DataSunrise instances. If you use the general case’s tips described above, it would be necessary to install a whole set of certificates on the client’s side and keep an eye on their applicability. To avoid possible mistakes, you can sign all certificates with a single certification authority. There are two options as well.
5.2.1 Your own Certificate Authority
This option is for creating your own certificate authority without additional dependencies from the operating system. Authority of such a certificate issuer would be minimal.
Prepare the infrastructure:
 mkdir db
mkdir db\new
mkdir db\private
echo. 2>db\index
echo 01> ./db/serial
echo unique_subject = no> ./db/index.attr
Fill out ca.cfg file:
 [req]
distinguished_name = req_distinguished_name
prompt = no
RANDFILE = ./db/private/.rand
[req_distinguished_name]
countryName = US
stateOrProvinceName = Washington
localityName = Seattle
organizationName = DataSunrise
organizationalUnitName = IT
commonName = DataSunrise
emailAddress = [email protected]
Fill out proxy.cfg file:
 [req]
distinguished_name = req_distinguished_name
prompt = no
RANDFILE = ./db/private/.rand
[req_distinguished_name]
countryName = US
stateOrProvinceName = Washington
localityName = Seattle
organizationName = Sunrise
organizationalUnitName = IT
commonName = wmserver.db.local
emailAddress = [email protected]
[ca]
default_ca = CA_default
[CA_default]
dir = ./db                  # top dir
database = $dir/index            # index file.
new_certs_dir = $dir/new              # new certs dir
certificate = $dir/ca.cer           # The CA cert
serial = $dir/serial           # serial no file
private_key = $dir/private/ca.pem   # CA private key
RANDFILE = $dir/private/.rand    # random number file
default_days = 365                   # how long to certify for
default_crl_days = 30                    # how long before next CRL
default_md = sha384
policy = policy_any             # default policy
email_in_dn = no                     # Don't add the email into cert DN
name_opt = ca_default             # Subject name display option
cert_opt = ca_default             # Certificate display option
#copy_extensions = none                   # Don't copy extensions from request
[policy_any]
countryName = supplied
stateOrProvinceName = optional
organizationName = optional
organizationalUnitName = optional
commonName = supplied
emailAddress = optional
Generate a root certificate ./db/ca.cer and a key ./db/private/ca.pem. This certificate (its key) will be used to sign all future certificates. Thus, ./db/ca.cer should be installed to a trusted certificates storage of all the clients that will check DataSUnrise certificates:
 ./db/private/ca.pem:
SET RANDFILE=.\db\private\.rand
SET PASS=TxK7T88C27
openssl genrsa -des3 -passout pass:%PASS% -out .\db\private\ca.pem 2048
openssl rsa -passin pass:%PASS% -in .\db\private\ca.pem -out .\db\private\ca.pem
openssl req -new -x509 -days 3650 -key .\db\private\ca.pem -out .\db\ca.cer -config ca.cfg
openssl x509 -noout -text -in .\db\ca.cer
Generate and sign proxy.pem:
 SET RANDFILE=.\db\private\.rand
SET /P serial=<.\db\serial
SET PASS=RTqSWs0koH
openssl genrsa -des3 -passout pass:%PASS% -out .\db\private\%serial%.pem 2048
openssl rsa -passin pass:%PASS% -in .\db\private\%serial%.pem -out .\db\private\%serial%.pem
openssl req -new -key .\db\private\%serial%.pem -nodes -config proxy.cfg -out .\db\private\%serial%.req
openssl ca -batch -config proxy.cfg -infiles .\db\private\%serial%.req
openssl ecparam -genkey -name secp256r1 -out .\db\private\%serial%.ec.pem
openssl dhparam -out .\db\private\%serial%.dh.pem 1024
COPY .\db\new\%serial%.pem+key.pem+.\db\new\%serial%.dh.pem+.\db\new\%serial%.ec.pem proxy.pem /b
MOVE .\db\new\%serial%.pem .\db\new\%serial%.cer
Created certificates will be saved in the db\new\ folder
Generated keys and packed pfxs (key and certificate) will be saved in the db\private\ folder
Example. A set of keys number “01”:
db\new\01.cer — New certificate db\private\01.pem — New private RSA key db\private\01.dh.pem — New DH parameters db\private\01.ec.pem — New parameters and EC key
During each generation of proxy.pem a new set of keys will be created. It will correspond a newly-generated proxy.pem. After replacement of proxy.pem in DataSunrise, it is necessary to restart the Core for the changes to take effect. Having a new set of keys you can also use the method 5.1.2 for adding the keys to the UI without changing the proxy.pem.
5.2.2 Running a corporate Certificate Authority
If it is required to protect several client hosts, or there are several DataSunrise hosts included into a corporate network (domain) or several trusted networks (forest), it would be handy to use Active Directory Certificate Services. In this case you can use certreq to generate a proxy.pem. Let’s take a proxy.cfg described in the subs. 5.1.1. and generate a proxy.pem (the commands should be executed as a user with sufficient privileges to issue new certificates or as a domain administrator):
 SET RANDFILE=random
SET PASS=89RT90qSWs020koH12
openssl genrsa -des3 -passout pass:%PASS% -out key.pem 2048
openssl rsa -passin pass:%PASS% -in key.pem -out key.pem
openssl req -config proxy.cfg -new -key key.pem -out certificate.req
certreq -submit -attrib "CertificateTemplate:WebServer" certificate.req certificate.cer
openssl ecparam -genkey -name secp256r1 -out ec.pem
openssl dhparam -out dh.pem 1024
COPY certificate.cer+key.pem+dh.pem+ec.pem proxy.pem /b
DEL random certificate.req
certreq will display a dialog to select a corporate certification center which should be used to issue a new certificate. Usually, it is only one center in such a list:
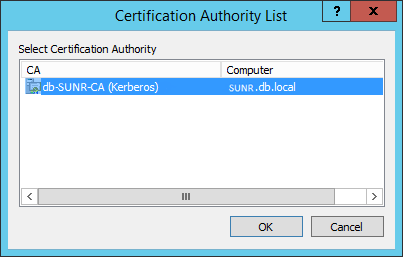
But this depends on corporate domain infrastructure. Consult your administrator if necessary.
Having installed the proxy.pem, no additional configuring of the network client is required, because after the installation of AD CS, the root certificate covers all hosts of the domain/forest automatically.
By using a key set and a certificate (certificate.cer, key.pem, dh.pem, ec.pem), you can also use the method described in subs. 5.1.2 to add keys via the web UI without changing the proxy.pem.
5.3 A lot of clients
When you need to apply a certificate to a big number of clients, you can use group policies. Refer to the following Microsoft guide: https://technet.microsoft.com/en-us/library/cc770315%28v=ws.10%29.aspx?f=255&MSPPError=-2147217396 (Deploy Certificates by Using Group Policy)
6 Conclusion
By using any method described above, you can achieve a high level of security of proxy connection, but it’s up to you to choose a method which suits your infrastructure the best. To ensure full security for your SQL Server dababase you can use the following DataSunrise tools: