Running DataSunrise on Kubernetes Using Helm Chart
Introduction
Deploying applications in Kubernetes can be complex, requiring detailed knowledge of its various components and their functions. Helm simplifies this process, making Kubernetes deployment straightforward and manageable. Instead of manually creating and maintaining multiple YAML manifests for each Kubernetes object, Helm consolidates everything into a single package that can be easily deployed to your Kubernetes cluster. This significantly reduces the time and complexity involved in managing Kubernetes applications.
DataSunrise has created a Helm Chart to facilitate the easy installation and operation of DataSunrise on Kubernetes. Helm streamlines the management of Kubernetes applications, simplifying and unifying the deployment process for DataSunrise. With Helm, you can easily install and upgrade DataSunrise as needed in any of your Kubernetes environments, including cloud providers such as AWS EKS, Azure AKS, and Google Cloud GKE clusters. The chart supports multiple use cases based on the values provided.
Key Features of the DataSunrise Helm Chart
The DataSunrise Helm Chart includes several key features that enhance its functionality and ease of use:
Proxy Functionality: A proxy is used on each node, and Kubernetes manages load balancing between them, ensuring efficient distribution of traffic and improved performance.
Autoscaling: Utilizes powerful Sensitive Data Discovery to automatically add new pods to the cluster during peak loads, ensuring optimal resource utilization and consistent performance.
Easy Installation: The Helm Chart can be easily installed via the Artifact Hub application, simplifying the deployment and management of DataSunrise on Kubernetes.
Prerequisites
Our Helm chart works with both vanilla Kubernetes and managed Kubernetes services such as AWS EKS, Azure AKS, and Google Cloud GKE. For this guide, we'll use AWS EKS to demonstrate the deployment steps.
You'll need the following components in your environment:
- EKS Cluster: Create an EKS cluster and pods in your AWS environment
- Helm 3.6+: Required for chart management
- Kubernetes 1.21+: This is the earliest tested version, though the chart may work with earlier versions
- External Databases: Required for production workloads and High Availability (HA) mode
Why External Databases Are Required for HA Mode
DataSunrise uses two key types of databases to store its operational data: the Audit Database and the Dictionary Database. To ensure high availability and scalability, DataSunrise can be configured across multiple servers. When deploying DataSunrise in a multi-server configuration, a PostgreSQL, MySQL/MariaDB, or MS SQL Server database is used to store the common Dictionary and Audit data.
Audit Database
The Audit Database in DataSunrise is essential for storing detailed logs of all monitored database activities, including SQL queries, user actions, and security events. This database provides a comprehensive audit trail and facilitates security monitoring by detecting suspicious activities. DataSunrise supports PostgreSQL, MySQL, MariaDB, and MS SQL Server for the Audit Database. It's crucial to allocate sufficient storage and manage retention policies to handle the potentially significant growth of audit data.
Dictionary Database
The Dictionary Database holds the configuration and metadata necessary for DataSunrise to operate, including information about database instances, security rules, audit rules, and user roles. It ensures that DataSunrise can function smoothly by maintaining all required configuration data. Like the Audit Database, DataSunrise supports PostgreSQL, MySQL, MariaDB, and MS SQL Server for the Dictionary Database. This database should be highly available and secured with strong passwords because it is vital for the uninterrupted operation of DataSunrise.
For more information about preparing external databases for use as audit and configuration databases, please refer to the Admin Guide's Chapter 4: MultiServer Configuration (High Availability mode). By using external databases for both the Audit and Dictionary databases, DataSunrise can provide robust high availability, ensuring continuous operation and consistent security monitoring across your database environment.
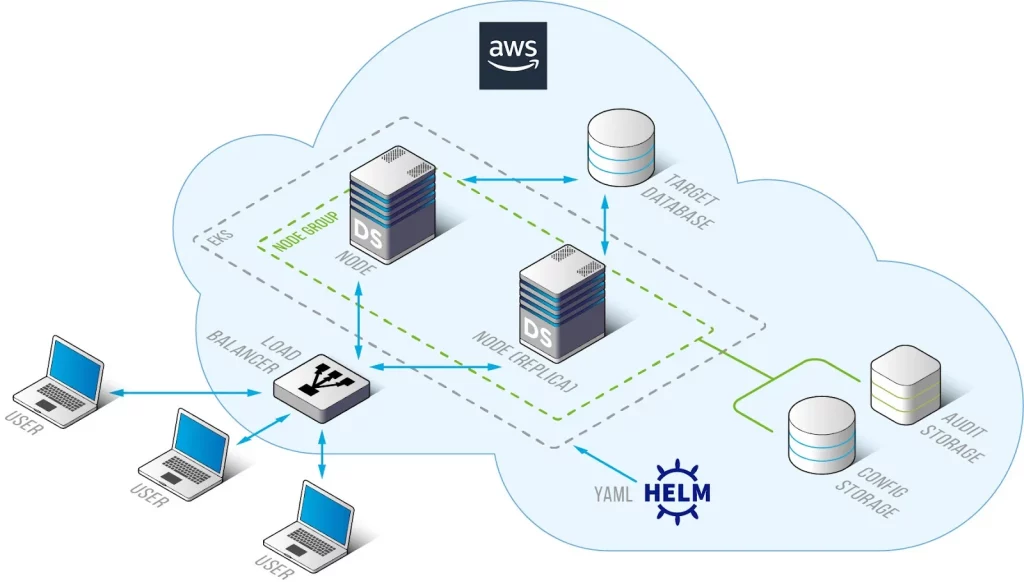
Picture 1. Deployment Structure of DataSunrise on K8S with Helm Chart
Preparing Your AWS EKS Cluster
Step 1: Install Required Tools
After your EKS cluster and the node where you want to install DataSunrise are ready, install the following tools:
- kubectl: Directly interacts with Kubernetes clusters, essential for cluster and application management
- Helm: Manages Kubernetes applications through charts, simplifying deployments and upgrades
- AWS CLI: Manages AWS resources, useful for automating AWS tasks and integrating services
Install kubectl
curl -LO https://storage.googleapis.com/kubernetes-release/release/`curl -s https://storage.googleapis.com/kubernetes-release/release/stable.txt`/bin/linux/amd64/kubectl
chmod +x ./kubectl
sudo mv ./kubectl /usr/local/bin/kubectl
Install Helm
curl https://raw.githubusercontent.com/helm/helm/main/scripts/get-helm-3 | bash
Install AWS CLI
curl "https://awscli.amazonaws.com/awscli-exe-linux-x86_64.zip" -o "awscliv2.zip"
unzip awscliv2.zip
sudo ./aws/install
Step 2: Configure AWS Credentials
Configure your AWS credentials by running the following command:
aws configure
After executing this command, you'll be prompted to enter your AWS Access Key ID, AWS Secret Access Key, default region name, and preferred output format:
AWS Access Key ID [None]: ************
AWS Secret Access Key [None]: ************
Default Region name [None]: us-east-2
Default output format [None]: json
Step 3: Configure kubectl for EKS
Configure your kubectl to interact with the specified EKS cluster in the given region. After updating the kubeconfig, verify the update by checking the status of the pods in the kube-system namespace:
aws eks update-kubeconfig --region <region_name> --name <cluster_name>
kubectl get pods -n kube-system -l k8s-app=aws-node -o wide
Installing DataSunrise Using Helm
Step 1: Download and Install the Helm Chart
You can either download the Helm chart values.yaml file manually from the Artifact Hub or install the Helm chart using the following commands:
helm repo add datasunrise https://www.datasunrise.com/helm-chart
helm install my-datasunrise datasunrise/datasunrise --version 1.2.14
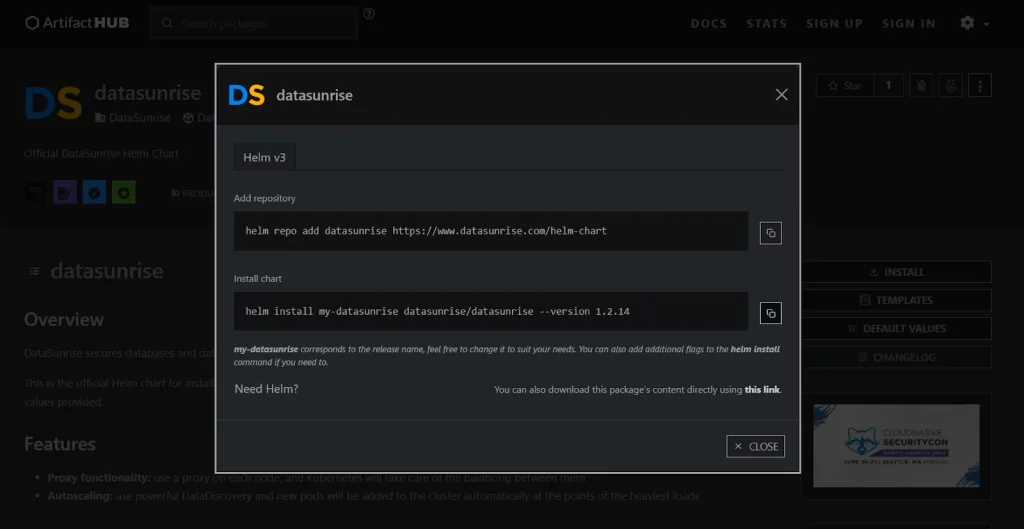
Picture 2. DataSunrise Helm Package Installation
The structure of the directory should be as follows:
my-chart/
├── Chart.yaml
├── charts/
├── templates/
├── values.yaml
Step 2: Configure values.yaml
Open and edit the values.yaml file. You'll need to edit the following values:
- envVars: Configure your dictionary and audit database properties
- uiService: Change the type from ClusterIP to LoadBalancer
- ingress: Enable the ingress configuration
Important Security Note: It is crucial to use strong passwords in your application setup. A strong password should be over 8-12 characters long and include a combination of uppercase and lowercase letters, digits, and special characters. For example: P@ssw0rd#2024!
Example AWS Secrets Manager Configuration
apiVersion: secrets-store.csi.x-k8s.io/v1alpha1
kind: SecretProviderClass
metadata:
  name: aws-secrets
  namespace: default # Change to your preferred namespace
spec:
  provider: aws
  secretObjects:
  - secretName: k8s-secret
    type: Opaque
    data:
    - objectName: db_password
      key: password_for_ds
  parameters:
    objects:
      - objectName: arn:aws:secretsmanager:us-east-1:xxxxxx:secret:MySecret
        objectType: secretsmanager
        jmesPath:
          - path: password_for_ds
            objectAlias: db_password
Environment Variables Configuration
envVars:
  - name: DICTIONARY_TYPE
    value: "postgresql"
  - name: DICTIONARY_HOST
    value: "your_dictionary_host"
  - name: DICTIONARY_PORT
    value: "5432"
  - name: DICTIONARY_DB_NAME
    value: "dictionarydb"
  - name: DICTIONARY_LOGIN
    value: "postgres"
  - name: DICTIONARY_PASS
    valueFrom:
      secretKeyRef:
        name: k8s-secret
        key: password_for_ds
  - name: AUDIT_TYPE
    value: "postgresql"
  - name: AUDIT_HOST
    value: "your_audit_host"
  - name: AUDIT_PORT
    value: "5432"
  - name: AUDIT_DB_NAME
    value: "auditdb"
  - name: AUDIT_LOGIN
    value: "postgres"
  - name: AUDIT_PASS
    valueFrom:
      secretKeyRef:
        name: k8s-secret
        key: password_for_ds
UI Service Configuration
uiService:
  type: LoadBalancer
  port: 11000
  annotations: {}
Ingress Configuration
ingress:
  enabled: true
  className: ""
Note: If your pod gets stuck in "Pending" status, disable the volume:
localSettingsPersistentVolume:
  ## If 'true', then Persistent Volume Claim will be created/used.
  ## If 'false', then emptyDir will be used.
  enabled: false
Step 3: Set Up Ingress
To connect to the DataSunrise web UI, you need to set up ingress:
helm upgrade --install ingress-nginx ingress-nginx \
  --repo https://kubernetes.github.io/ingress-nginx \
  --namespace ingress-nginx --create-namespace
This command pulls the ingress-nginx chart from the specified repository and installs it in the ingress-nginx namespace, creating the namespace if it doesn't already exist. This setup will enable you to manage external access to your DataSunrise services through Kubernetes Ingress resources.
Next, you need to set the host for your Ingress. To find the load balancer link, navigate to your AWS EKS cluster dashboard, then go to "Resources" → "Service and networking" → "Service" → "ingress-nginx-controller", and copy the URL of the LoadBalancer. Once you have the URL, use it to set the host field in your Ingress configuration.
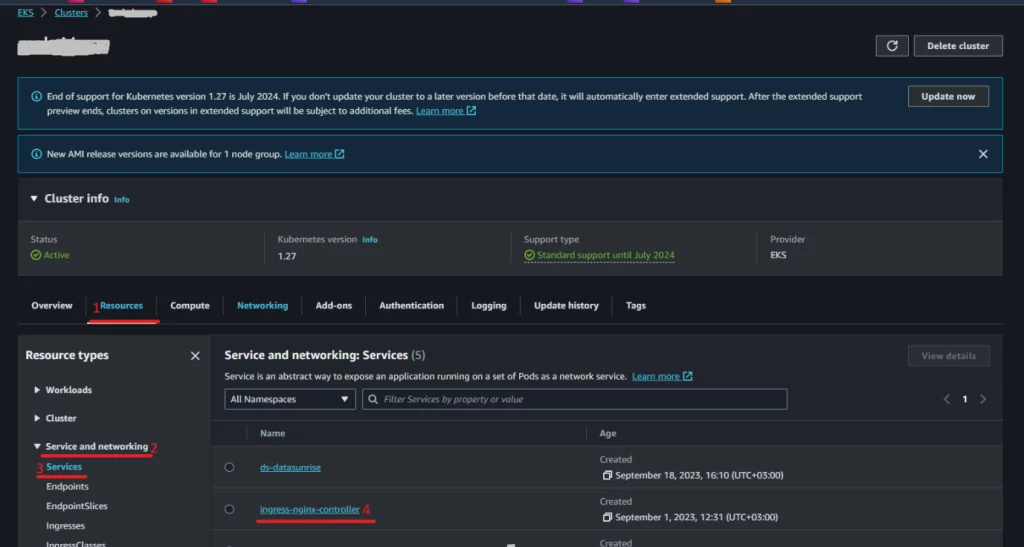
Picture 3. How to find the load balancer link in AWS EKS (1)
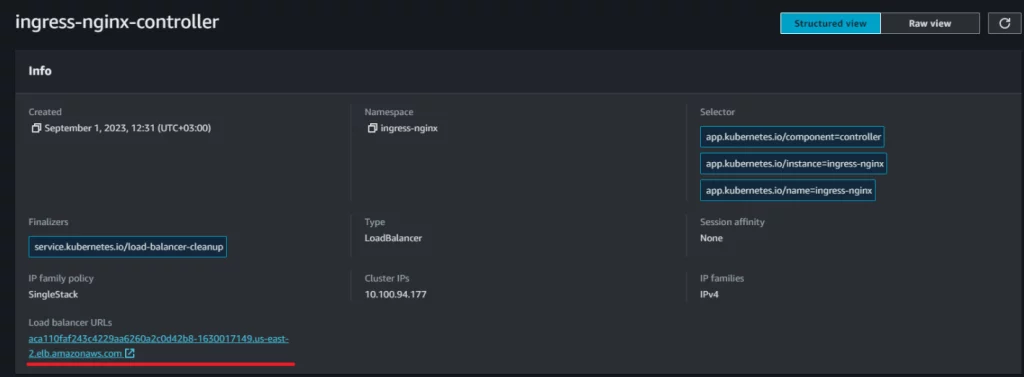
Picture 4. How to find the load balancer link in AWS EKS (2)
Complete Ingress Configuration
ingress:
  enabled: true
  className: "nginx"
  ## Some additional annotations are needed for the ingress.
  ## If you are using nginx, the necessary annotations are already present below.
  ## If you use a different ingress, you need to find similar annotations for your class.
  ## The HTTPS backend and 'sticky session' annotations are needed
  annotations:
    nginx.ingress.kubernetes.io/backend-protocol: "HTTPS"
    nginx.ingress.kubernetes.io/affinity: "cookie"
    nginx.ingress.kubernetes.io/affinity-mode: "persistent"
    # kubernetes.io/ingress.class: nginx
    # kubernetes.io/tls-acme: "true"
  hosts:
    - host: # Insert your load balancer URL here
      paths:
        - path: /
          pathType: ImplementationSpecific
Step 4: Install DataSunrise
After configuring the host, you can install DataSunrise using Helm. Ensure you are in the directory containing the Helm chart script, then execute the following command:
helm install ds .
To track the status of the installation, use the following command:
kubectl get pods
If the pod is not starting, check the logs:
kubectl logs <pod_name>
Step 5: Access the DataSunrise Web UI
After the DataSunrise pod is running, you should be able to connect to the DataSunrise web UI using the LoadBalancer link from the previous step. Alternatively, you can check the services using this command:
kubectl get services

Picture 5. Sample Results of 'kubectl get services'
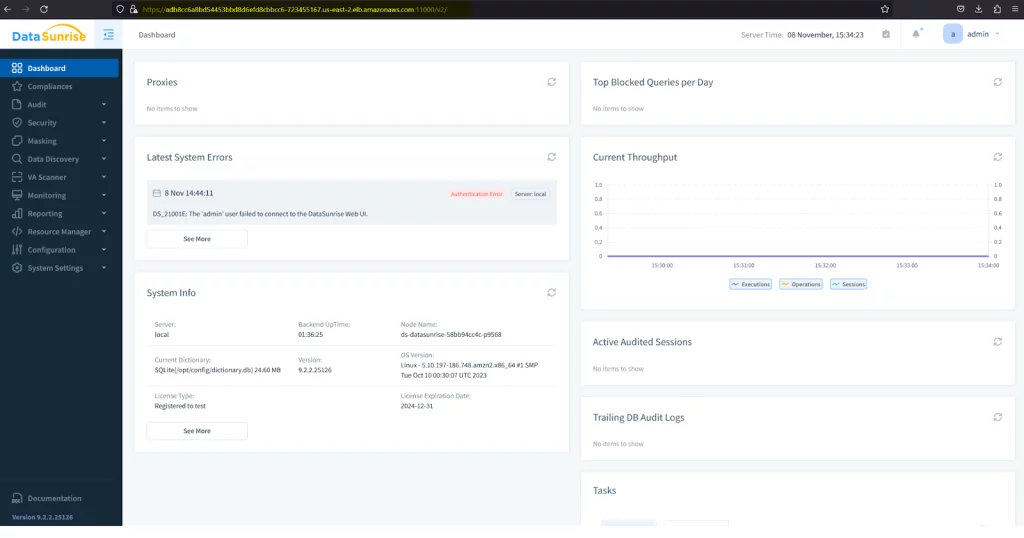
Picture 6. Connecting to DataSunrise Web Console
Step 6: Upgrading DataSunrise
If you want to update DataSunrise to a newer version, modify the version specified in the values.yaml file to the desired version. Once you've made the necessary changes, execute the following command to upgrade DataSunrise:
helm upgrade ds .
Configuring Connection to Target Database
When your DataSunrise cluster built with Kubernetes and Docker is up and running, you can configure DataSunrise Rules to audit, secure, or mask your sensitive database columns. See the "DataSunrise Use Cases" section of the DataSunrise User Guide for more information.
DataSunrise interacts with a target database and receives all information required for operation through a user account of this database. The account, username, and password are specified in the target database profile in the Web Console. You can use the database administrator's account for connection, but it is also possible to use any other user account with sufficient privileges. The user guide section "5.2 Creating Database Users Required for Getting the Database's Metadata" describes the actions required to establish a connection between DataSunrise and various databases.
After configuring the database user for retrieving the metadata of the database, proceed with the following steps to connect with DataSunrise via the web console:
Step 1: Log in to DataSunrise Web Console
Use the external IP address obtained from the previous step to access the DataSunrise Web Console.
Step 2: Add Target Database Instance
- Navigate to Configuration → Database Instances
- Click on "Add New Instance" and fill in the required details:
- Logical Name: A reference name for the database
- Hostname or IP: The address of the target database
- Authentication Method: Choose the appropriate method (e.g., database username/password, Active Directory)
- Database Type: Select the type of your target database (e.g., MS SQL, PostgreSQL)
- Port: The port number on which the database is running
- Database Name: The name of the target database
Step 3: Test Connection
- Click on the "Test" button to ensure that DataSunrise can successfully connect to the target database
- Once the connection test is successful, click "Save" to add the database instance to DataSunrise
Step 4: Set Up Security and Auditing Rules
Navigate to the Rules section in the DataSunrise Web Console. Create and configure rules for auditing, security, and data masking according to your requirements.
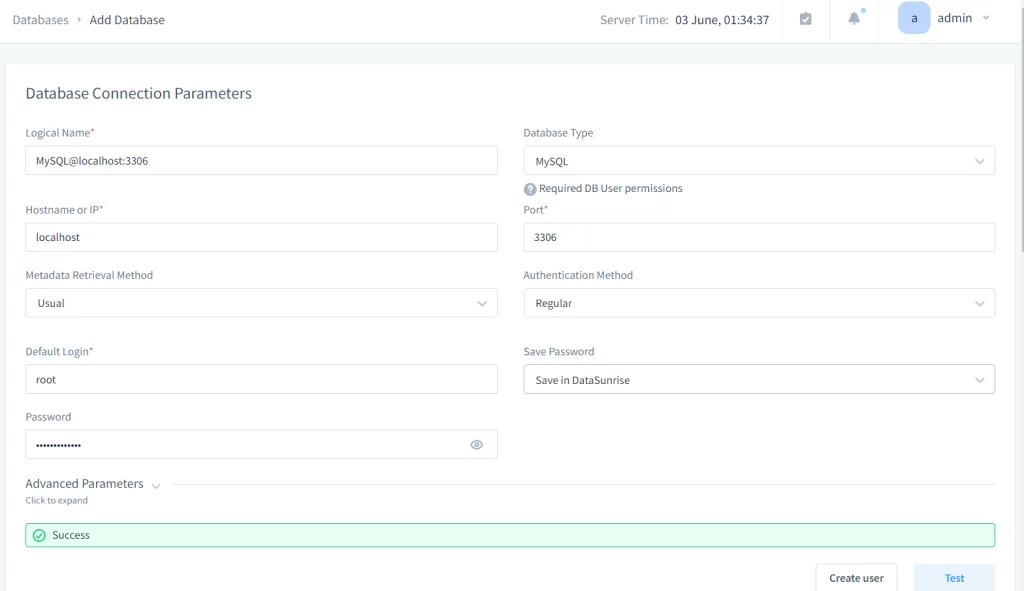
Picture 7. Testing Connection in DataSunrise
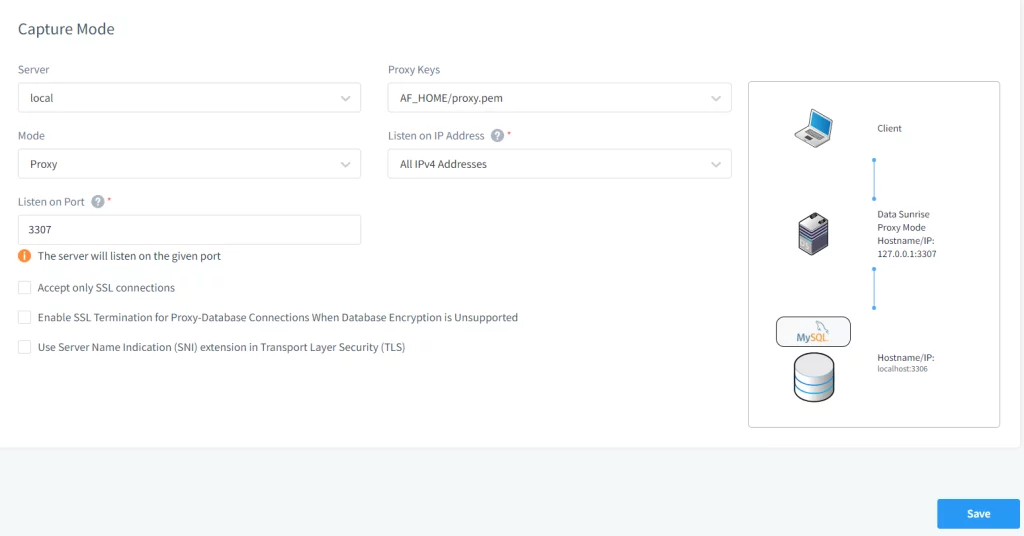
Picture 8. Establishing Proxy Connection in DataSunrise
Integrating AWS Secrets Manager with AWS EKS
AWS Secrets Manager is a robust tool that offers encryption at rest and secret rotation, making it an ideal choice for securely managing sensitive information. Given its approval by many security teams, it's a trusted solution for handling secrets within cloud environments. To enhance security in AWS deployments, such as with Amazon EKS, you can leverage AWS Secrets Manager to ensure your applications remain secure and compliant with best practices.
There are multiple ways to use the AWS Secrets Manager service in EKS Pods.
Using Kubernetes Secrets Store CSI Driver
While multiple custom implementations offer flexibility, they also require significant development, maintenance, and operational efforts. A more standardized and efficient approach is to use the Kubernetes Secrets Store CSI Driver. This driver integrates secrets stores with Kubernetes via a Container Storage Interface (CSI) volume, allowing secrets from AWS Secrets Manager to be mounted directly on the pod.
The Secrets Store CSI Driver simplifies the process of managing secrets by providing a native Kubernetes interface for secret management. It reduces the overhead associated with custom solutions and ensures a consistent and secure method for handling secrets within your Kubernetes environment.
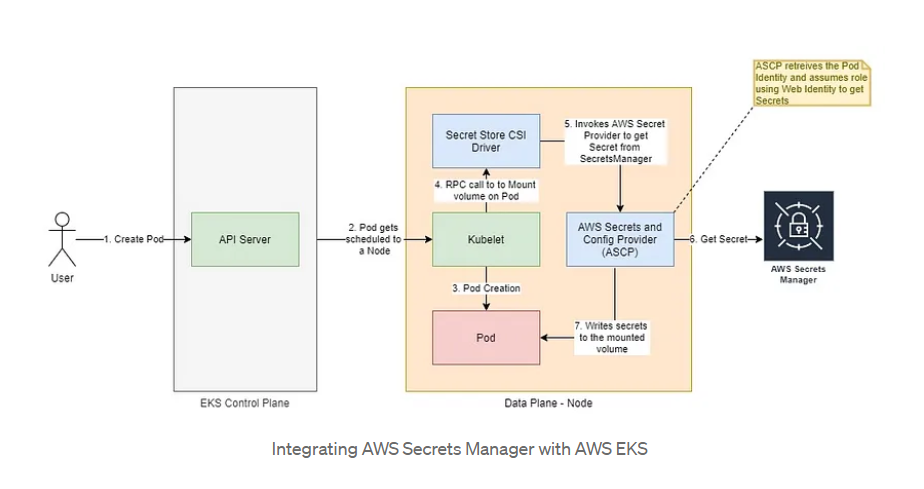
Picture 9. AWS Secrets Manager
For more information about the driver and its usage, check these resources:
Implementation Steps
Step 1: Install CSI Secrets Store Driver**
You need to ensure that the secrets-store.csi.k8s.io CSI driver is installed in your Kubernetes cluster. This driver allows Kubernetes to interact with external secret management systems.
helm repo add secrets-store-csi-driver https://kubernetes-sigs.github.io/secrets-store-csi-driver/charts
helm install csi-secrets-store secrets-store-csi-driver/secrets-store-csi-driver --namespace kube-system --set syncSecret.enabled=true
Step 2: Create a Secret in AWS Secrets Manager
Create a secret inside AWS Secrets Manager within the same region as your cluster using the AWS CLI or through the AWS Management Console.
Step 3: Set Environment Variables
Set two environment variables: REGION and CLUSTERNAME. These variables define the AWS region and the name of the EKS cluster.
REGION=<your_eks_region>
CLUSTERNAME=<your_cluster_name>
Step 4: Create the Secret
Create the secret in AWS Secrets Manager. Include JSON objects of your credentials or secrets. After running this command, the SECRET_ARN variable will contain the ARN (Amazon Resource Name) of the created secret.
SECRET_ARN=$(aws --query ARN --output text secretsmanager create-secret --name <your_secret_name> --secret-string '{"<key1>":"<value1>", "<key2>":"<value2>"}' --region "$REGION")
Step 5: Create IAM Policy
Create an IAM policy by running the command below. After running the command, the POLICY_ARN variable will hold the ARN of the created IAM policy.
POLICY_ARN=$(aws --region "$REGION" --query Policy.Arn --output text iam create-policy --policy-name <your_policy_name> --policy-document '{
    "Version": "2012-10-17",
    "Statement": [ {
        "Effect": "Allow",
        "Action": ["secretsmanager:GetSecretValue", "secretsmanager:DescribeSecret"],
        "Resource": ["'$SECRET_ARN'"]
    } ]
}')
Step 6: Create Service Account
Create a service account associated with the IAM policy you created earlier using eksctl. Before running the command, ensure you have eksctl installed and configured on your machine.
eksctl create iamserviceaccount --name <your_service_account_name> --region="$REGION" --cluster "$CLUSTERNAME" --attach-policy-arn "$POLICY_ARN" --approve --override-existing-serviceaccounts
The --approve flag confirms the creation of the service account without asking for confirmation, and --override-existing-serviceaccounts allows the command to overwrite existing service accounts with the same name.
Step 7: Create AWS Secret Provider Class
apiVersion: secrets-store.csi.x-k8s.io/v1alpha1
kind: SecretProviderClass
metadata:
  name: <your_secret_provider_class_name>
spec:
  provider: aws
  parameters:
    objects: |
      - objectName: "<your_secret_name>"
        objectType: "secretsmanager"
        jmesPath:
          - path: <key1>
            objectAlias: <key1>
          - path: <key2>
            objectAlias: <key2>
Step 8: Modify values.yaml
Modify the values.yaml file by using the secrets that you created in Step 4. You'll need to specify the envVarsSecretProviderClassName parameter with the name of the SecretProviderClass you created in Step 7. After modifying all the necessary fields in values.yaml, you can continue with the deployment of Helm.

Picture 10. Specify Parameter
Note: If you create a Kubernetes secret using a YAML manifest, you should include the secret in base64 encoding. See the example below:
# your_secret_file.yaml
apiVersion: v1
kind: Secret
metadata:
  name: db-secret
type: Opaque
data:
  password: cGFzc3dvcmQxMjMK # password1234 in base64 encoding

---
# values.yaml
envVars:
  - name: DICTIONARY_PASS
    valueFrom:
      secretKeyRef:
        name: db-secret
        key: password
Conclusion
The Helm Chart provided by DataSunrise with Kubernetes simplifies the deployment process, offering key features such as proxy functionality and autoscaling, ensuring optimal performance and reliability. Additionally, by adhering to best practices such as configuring external databases and utilizing strong passwords, organizations can enhance the security posture of their deployments. With DataSunrise deployed in Kubernetes, organizations can confidently protect their sensitive data while benefiting from the scalability and flexibility of containerized environments.
Utilizing strong passwords in conjunction with a secrets management service like AWS Secrets Manager significantly enhances the security posture of your deployments. By following these steps, you can securely manage and inject secrets from AWS Secrets Manager into your DataSunrise applications deployed via Helm on EKS.